Thursday, December 30, 2010

Ice Dams and Aging Insulation


After 30 years, many of our home's attic insulation is beginning to show its age.

In my house, after a few remodeling jobs that required me to venture up into the attic and disturb or pack down the insulation, I knew the time was now to add some additional cellulose insulation.

First, I measured various areas of the insulation's thickness. What should have been around 12" of insulation in many areas was less than 6". So, I went to Lowe's and estimating my home's 1200 square foot foundation size, I estimated I wanted to add a minimum of 6" of insulation through-out the attic. The salesman at the commercial desk told me I should order 30 bags of cellulose insulation (22 pounds each). Since I want to over-insulate rather than under-insulate, I ordered 50 bags and the blower which came free for 24 hours with a 20 bag purchase.

Going up into the attic, especially on hot summer or cold winter days is NOT my favorite activity! Add to that, the thought of blowing insulation and the resulting dusty conditions -- yuck!

The blower and insulation arrived on two pallets which were placed in our garage near the attic access. The blower looks like a large shop vac and has around 100 feet of 4" plastic hose that you drag into the attic with you.
You'll need:
-two people (one in the attic and one at the blower to feed the bales of insulation)
-a measuring stick to keep track of how thick the insulation is as you're blowing it
-walkie talkies or some other method to communicate between the two people
-flashlight or troublelights in the attic
-dust mask and goggles
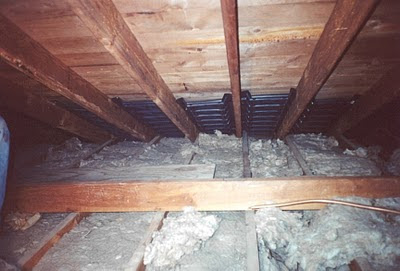
It took us around 5 hours to blow 41 bags of insulation into the attic which included time to fix 3 stoppages to unclog the blower unit. The blower only blows the insulation around 10 feet from the end of the hose so you'll want to start at the far reaches of the attic and move toward the access hatch. Be careful not to cover or clog the vent chutes at the edges of the roof line. It's too early to tell how much energy we'll save but I'm certain the $300 cost will be well worth it.

Tuesday, December 7, 2010

Bathroom Remodel


Bathroom BEFORE starting the remodel


Our home like most in the neighborhood was built around 1980 so some of the interior decor was starting to show its age.
Since moving into our home in 1998, we have wanted to remodel the walk-thru master bathroom but the project seemed daunting and the cost was another unknown factor.

Going into the project, there were several features we wanted to include:
- double sink vanity
- heated floors (eventually ruled out)
- skylight or solar tube
- all tile floor

We found the vanity on sale at Costco which jumpstarted the whole process. We knew we had 60" of space for the vanity which limited our double sink vanity choices since most are 72" long. When a 60" long double sink vanity and granite top that we liked went on sale, we immediately began researching the other choices and costs.


Some of the decision points:
- Tile the entire bathroom walls? We decided on only the shower surround and the floor due to cost and thought tiling the walls may make the bathroom more echo'y and also more harsh/hard feeling
- tile all the way to the ceiling in the shower -- we decided to do this and are very glad we did
- Replace the tub also? We left the original tub based mainly on our contractor's recommendation. It was in decent shape and was a cast iron Kohler tub so it was a quality tub.
- What color tile? We made several trips to Home Depot, Lowes, Menard's and the Ceramic Tile Shop on Zachary Lane in Maple Grove (one of our favorite tile shops). We also brought our remodeler, Jerry LeMire out one evening to help us decide on tile color, accent tiles and bullnose tile (the tile that goes along the edge of the shower and also along the baseboard). We eventually decided on a lighter tile to help with bathroom lighting and a matching grout.
It was difficult to find tile we liked that was affordable and that had matching bullnose. We purchased the tile from Home Depot and learned all Home Depots are not the same - the store in Fridley just north of I694 is a larger store and has a larger selection.
- Grout color - match the tile (per Jerry's advice)
- Replace the exhaust fan? We decided not to against Jerry's recommendation and of course the exhaust fan failed not long after we were done so I replaced it but it wasn't a fun job for a novice -- nothing ever fits or lines up like you think it should!
- build a shelf into the shower wall for shampoo bottles - we followed Jerry's recommendation and are VERY glad we had him install this and the tile shelf/ledge on the wall (see picture)

The project took around 2 weeks and the major steps were:
1. Called Jerry to get on his schedule
2. Purchase the long lead item, the vanity
3. Begin shopping for flooring, lights, faucets, toilet - I think we made a dozen trips to the home stores to finalize these details
4. Demo the bathroom (saved us some $$$) and took around 8-10 hours. Probably should have ordered a small dumpster as it was challenging to get rid of the demo'd materials and building scrap.

Sources:
- floor tile, mirrors and odds and ends - Home Depot
- accent tiles - Ceramic Tileworks (Zachary Lane in Maple Grove)
- tub and sink faucets - Delta from Lowe's
- carpet expert to finish the carpet where it meets the tile - John Thibodeau
- toilet - Kohler from Lowe's
- solar tube - Lowe's
- custom cabinet doors on the walls (linen closets) - custom made to match the vanity - Rich Hipp, Hipp Cabinetry and Contruction - did a great job matching the doors, everyone asks how we got them to match exactly
Contractor/Remodeler - Jerry LeMire. Jerry did a GREAT job and was very devoted to completing the job as efficiently as possible. His final bill came in right at what he estimated at the beginning of the project and his expertise and honest answers to our questions was refreshing.

Total cost for the project -- around $5900

Finished Product